Sunday, June 12, 2011

Ubuntu Sound System Restart

I used to have some issues when I go to standby mode time to time and use continuously few days. Sometimes I my sound system is not working, I just here small annoying sound when I try to play a song. But following steps helped me to restart the sound program.

Go to : System -> Preferences -> Sounds -> Hardware

There you will see your device selected and down you will see a dropdown to select profile. In the profile list there is one option of "Off", select it and again select the previous value you had.... These steps fixed my issue .
I just wrote a quick blog post before I forget the steps !!!

Wednesday, May 11, 2011

Monitor WSO2 Servers with Wireshark

I recently had to look in to how to use Wireshark to monitor the traffic between set of WSO2 products, I found some useful configuration steps which was bit difficult to find in a single place in internet. We had a requirement of monitoring all the HTTP traffic and we wanted to monitor complete payload even though some of the transactions were HTTPS, so I will be describing how to configure Wireshark for a scenario like this. Since I was new to Wireshark I found the initial instructions were not very clear to start using Wireshark, so that is one of another motivation for writing this blog post. This blog post will be a very quick one which doesn't contains any screenshots, I hope to write a detail one but I need to write this before I forget these steps...

My Environment is Ubuntu so when you install it using Ubuntu Software Center you will get a package which is compiled with GnuTLS so to monitor HTTPS traffic you don't have to compile Wireshark again. If you are on Non-Unix system you have to compile it with GnuTLS (there are plenty of documentation on how to do this).

I assume you have a service running on WSO2 WSAS which is secured and you have a client to invoke that Service, and you have another client invoke another unsecured Service in WSAS, with this setup you can monitor HTTP and HTTPS traffic goes to both services.

  1. Start Wireshark and see whether you see set of Interfaces where you can monitor, if you do not see any interface, it's because you do not have enough rights to monitor any of the interfaces. So please start as a root/sudo mode if you did not see any interface.
  2. Now go to Edit -> Preferences -> Protocols -> HTTP there you will see two entries like "TCP/Ports" and "SSL/Ports". Add your Servers (WSO2 WSAS) HTTP port in to TCP/Ports list with a comma if you have number of ports to configure in a scenario where you want to monitor traffic among few hops add them as comma separated values. (Ex: HTTP - 9763).
  3. Now add your server HTTPS port in to SSL/Ports entry, by default it's having 443 to monitor browser HTTPS traffic (Ex:, HTTPS - 9443).
  4. Now you are in a position to monitor the traffic goes to WSAS by applying http filter. But you will not see the encrypted messages going to the Secured Service. To decrypt the messages which goes to WSAS you need to export the private key of the server (WSO2 WSAS). To do that you can use a simple tool like Keytool IUI[2].
  5. Download the keytool IUI [2], extract it and run the script (I got some errors in the tool when I was trying to run the shell script, so if you get the same just run the following command). $JAVA_HOME/bin/java -Xms128m -Xmx196m -jar rc15ktl.jar
  6. This will open the Keytool and go to Export -> KeyStores Entry -> Private Key There you will see four fields to be filled. Now what we are going to do is simply get the private key of the WSO2 WSAS in unencrypted format and add that in to Wireshark which will help to decrypt the messages.
  7. Give the keystore file path which is WSAS_HOME/resources/security/wso2carbon.jks, and the password will be wso2carbon, The add private Key and Certificate Chain file locations to the place where you want to store the private key. And make sure you put the file type as PEM in last two fields.
  8. After pressing OK you will ask to select the select Keypair trust among a list, select the entry you have "wso2carbon" as the alias. Lets assume the output private key file path is /home/lahiru/client/fhlb/wso2is-3.0.1/resources/security/private.pem.
  9. Now you have have the private key of the server in unencrypted format, now go to Edit -> Preferences -> Protocols -> SSL there you will see a field (empty) RSA Key list for that add the following entry. 127.0.0.1,9443,http,/home/lahiru/client/fhlb/wso2is-3.0.1/resources/security/private.pem ,,,private-key-path-of-the-server
  10. Since we are going to monitor traffic in the same machine we are selecting the interface 127.0.0.1 (If your operation system is Windows things will not work out of the box with loop-back address so for window users please refer this[1]). To select the interface go to Capture -> Interfaces there you will see 127.0.0.1 press the start button in 127.0.0.1 interface.
  11. Now you can send two messages to secure and un-secure services then after you get the responses go to Wireshark and add Filter (from the top field with the name filters) http.
  12. Now ideally you should see four entries, request-response messages for two transactions and you will be able to view the content of the secure request-response messages too.
Please refer[3] for further detail about how to decrypt the messages using Wireshark.

Friday, March 4, 2011

A Great mahindian sets down


Even though I thought of writing a blog post about Monath ayya who left us few days back I am not in a good position to have creative ideas, I have been thinking about him hundred times last few days. For me accepting he left us is really painful. I am sorry that I couldn't make it to Monath ayyas funeral because I am out of the country but no matter where we are you are always at the bottom of our hearts.

I remember the way we played cricket in Sangamitta ground, the way we went to school together long time back and the time I met you during last Mahinda Night in April you were still Monath ayya .... the humble simple man. From the school days Monath ayya was a genius who were there in our school and he was a model which we always used to talk as a senior student. He was the active guy and he was the actor and he was the best English Literature expert and He was the College western band Leader. There was a math class we all used to go (Mrs Gange) and I still remember he used to be given gifts from the teacher for getting 100 marks for the exams.
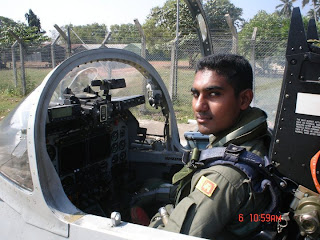
During the time we had the war we were very strong as Mahindians because we all knew that you are a hero in Air Force, we never needed any one else. We were proud about you when we heard that you were the best flying officer, we were proud about you when we see your name in the paper and we were proud to see your pictures with Kafirs but finally we were not lucky to be with you. You are always our pride Monath ayya...
Simply it was like my brother is fighting in the war and I believe it's same for any mahindian. We are always greatful to you the job you have done for sake all of us. You stayed little time with us and did amazing thing for us and you left us. Still I cannot imaging that I won't be able to see you or talk to you again... though this is quit painful I am personally trying to accept the fact that we lost you ... We all love you Monath ayya ... you are the unforgettable Mahindian in our time. We all proud of you... I am sorry again that I couldn't pay my respect to you but I will make sure I will do my job for you according to our religion....

Rest in Peace Monath ayya .... You are a great Mahindian ... you are a great Hero .... You are a great Sri Lankan you are the Humble good man we always call Monath ayya ...our pride !

Friday, January 28, 2011

Installing Apache Qpid with persistency on Enterprice SUSE Linux

This document describes how to install Apache Qpid C++ broker 0.8 with persistence on Enterprise SUSE Linux.
    1. Checkout the 0.8 source code from here[1] and checkout the separate persistence module for 0.8 release from here[2]. And Download the Qpid C++ broker & client distribution from here[3].
    • Note: You need to checkout the complete source of Qpid because, to configure the persistency module you need some other parts of the Qpid distribution, only C++ source will not be enough.
    1. Assume QPID-DIR is the directory where you have checked out the sources.


Installing Qpid C++ broker
  1. Extract qpid-cpp-0.8.tar.gz and assume Qpid C++ code will be found in $QPID-DIR/qpidc-0.8 directory.

You will see following directories inside QPID-DIR, these directories will be used in below instructions,
QPID-DIR
- qpidc-0.8 - qpid source we are going to build
- qpid - complete qpid source code to be used during building of persistence module
- cpp - persistence module source code
  1. Before start building from the source, please install following required libraries using yast (Put the SUSE DVD in to your drive and install from yast). You need to have an internet connection to install some components, because some of these libraries cannot be found in the SUSE distribution DVD pack. For them please download RPMs with dependencies and install them.
      1. boost (1.35)(*)
      2. e2fsprogs (1.39)
      3. pkgconfig (0.21)
      1. openais (0.80.3)
      2. corosync (1.0.0.rc1)
      3. xqilla (2.0.0)
      4. xerces-c (2.7.0)
      5. nss
      6. nspr
      • Qpid has been built using the GNU C++ compiler:
      1. gcc (3.4.6)
      2. GNU make (3.8.0)
      3. autoconf (2.61)
      4. automake (1.9.6)
      5. help2man (1.36.4)
      6. libtool (1.5.22)
      7. doxygen (1.5.1)
      8. graphviz (2.12)
      9. ruby 1.8 (1.8.4)
      10. ruby-devel
      11. python-devel
      12. swig (1.3.35)

  1. After successfully installing the required packages run the following commands inside $QPID-DIR/qpidc-0.8
    • Note: Please make sure you are not on root during configuring and making the project, you need to be on root only when running make install command.
      • ./configure --without-sasl=no --prefix=$QPID-DIR/qpidc-0.8/build
      • make
      • su
      • make install

    • Note: during the configuring and build process if you get an error telling cannot find a particular library try to find out the required package to install with the use of the error and yum search command, install them and try to build again from the beginning.

  1. After successfullying running above commands you can see a directory "build" inside $QPID-DIR/qpidc-0.8. To start Qpid C++ broker run the script $QPID-DIR/qpidc-0.8/build/sbin/qpidd. (Make sure you switch back to the normal user mode from root login)

  1. If you need any configuration changes, edit the qpidc.conf file inside $QPID-DIR/qpidc-0.8/build/etc.


Installing Qpid persistency module
  1. Now shutdown the started server and install the following packages using yum.
    • libaio-devel
    • libdb-devel
    • With Enterprise SUSE Linux we encountered some issues with version in-compality during installation of libdb-devel so please follow the below steps.
  1. Run yast and search for the text “bdb” (berkley database) and you will see libdb-4.5 packages remove all the 4.5 libdb packages, during this process yast will show you the dependent components for these packages and ignore removing them during the un-installation process.

  1. Remove if there are libraries with the name libdb_cxx-4.3 in /usr/lib/ directory for that you can simply run a find command inside /usr/lib like below
  2. find -name ‘*db_cxx*’ , if there are files (.so files) remove them from /usr/lib/

  1. Now download libdb-4.6-devel and libdb-4.6 rpms and install them.

  1. After installing this required header files will get saved in to /usr/include/db/include/ directory copy two header files in /usr/include/db/include (db_cxx.h and db.h) to /usr/include directory.

  1. Now you are ready to do the configure, make and make install follow the steps below to proceed with building the message store module.
  1. After successfully installing above packages run the following commands to build the persistence module inside QPID-DIR/cpp/ to build the persistency module. (Assume with the first step you have checked out the message store module to QPID-DIR/cpp).

Note: In the very first step we have checked out the complete qpid source from [1] so we are going to use that location ($QPID-DIR/cpp) during the build of the persistence module.

./bootstrap

./configure --with-qpid-checkout=$QPID-DIR/qpid

make

su root

make install

  1. Add the path $QPID-DIR/cpp/lib/.lib/ to you LD_LIBRARY_PATH.


Running Qpid C++ broker with persistency
  1. Now you are ready to start Qpid C++ broker with persistency module. Run the following command to start Qpid C++ broker.


cd $QPID-DIR/qpidc-0.8/build/sbin

./qpidd --load-module msgstore.so

  1. To view the message store module configurations run the qpidd like this.
    • ./qpidd --load-module msgstore.so -h

  1. Finalize your configuration in the broker and start Qpid broker using step 4.1 and start the Listeners first, so broker will create durable queues for all the listeners.


[1]https://svn.apache.org/repos/asf/qpid/tags/0.8/qpid/
[2]http://anonsvn.jboss.org/repos/rhmessaging/store/tags/qpid-0.8-release/cpp/
[3]http://qpid.apache.org/download.cgi